Deployment Approach
A SeaTable Server consists of multipe containers. Therefore let's talk about how you typically install such a system.
Multi-container installations can be intricate
Usually, software relying on multiple containers involves a large and complex docker-compose.yml file. This complexity intensifies with optional containers, leading to bloated files or the need to manually manage additional services. This is quite a challenging task.
In addition, consistently maintaining correct indentation and syntax alignment in the YAML file demands caution. In summary, this process can be cumbersome, prone to errors, and challenging—particularly for beginners or users unfamiliar with docker-compose files.
We want to keep it simple ...
Instead of handling one extensive docker-compose.yml file, we present a more structured approach:
- We provide a set of individual yml files and one .env file.
- Each yml file defines commands for installing a specific component, such as the SeaTable Server, web proxy (caddy), or python pipeline.
- An accompanying .env file manages environment variables to configure your setup.
Layered structure
Think of the .env file as a recipe for your setup and the yml files are like ingredients.
Create copy for custom changes of the yml files
Generally, there's no need to modify the YAML files. We provide updated YAML files with each new SeaTable version. However, if you wish to make alterations, create a copy and name it something like custom-...yml.
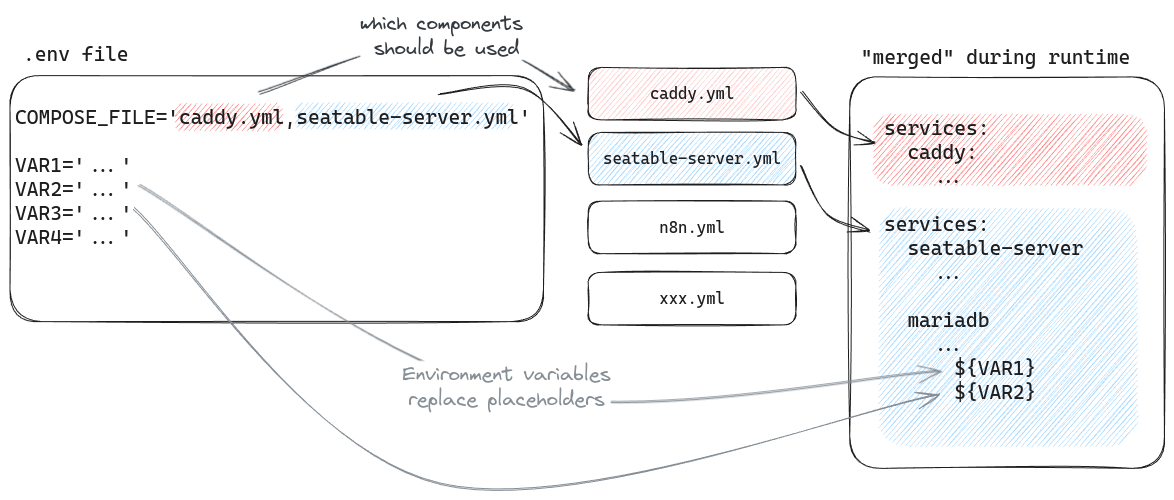
You can configure components in the .env file, determining which ones to install. Start with essential components like SeaTable Server and Caddy web proxy.
Example in the .env file:
COMPOSE_FILE='caddy.yml,seatable-server.yml'
By adding or removing yml files from this list, you control the composition during runtime, eliminating the need for a single, extensive docker-compose.yml file.
With this understanding, the subsequent installation descriptions should be straightforward to follow.
Primarily, use copy and paste
Throughout the installation process, we strive to eliminate the need for manual file editing. Most commands can be executed by simply copying and pasting. Look for the copy-and-paste icon () at the end of each code box, which conveniently copies the content to your clipboard. This helps prevent typing errors and ensures a smoother installation experience.
Additional Components
Like the basic installation, the installation of the additional components will be easy and straight forward. Additional components are solutions that either extend the functionality of SeaTable or help your during your daily live.
These are the assumptions that we assume:
- Your SeaTable Basic Setup is up and running
- Your server is public reachable and you use a let's encrypt certificate
- Additional services are provided by port (and not by subdomain)
- If you block incoming traffic with a firewall, you have to open some ports to make the soluation reachable over the internet.
Used Ports
This is the list of ports that the components use. You only have to open them if you want
- SeaTable: 80 and 443
- N8n: 6231
- Collabora: 6232
- OnlyOffice: 6233
- Uptime Kuma: 6230
- Zabbix: 6235
Separate server or subdomain
This is possible for sure. Right now the installation follows the assumption from the top. You will find articles in the Advanced Setup explaining how to use custom certificates, custom domains or separate servers.